The Galley Decisions You Can't Undo.
The galley is the part of a teardrop you use most and the part you can change least. Everything in it is cut into structural panels, plumbed, or wired, and by the time you find out that the drawer fouls the fridge slide or the counter is two inches too low, the panels are finished and the hatch is hung. Most of these choices cost nothing to get right on paper and a great deal to fix afterwards. Here's the order we'd decide them in.
Start With What You Actually Cook
Every other decision falls out of this one, and it's the one people skip. A galley built for someone who boils water and reheats is a different galley from one built for someone who cooks a real dinner for four with two pans going.
Be honest rather than aspirational. If most trips are two nights and dinner is one pan, you need less counter and more storage than you think. If you cook properly, you need somewhere to put a hot pan down that isn't the same surface you're chopping on, and that single requirement can drive the whole layout.
Write down the three meals you actually make on a trip. Then walk through making one in your head, in order, naming where each thing sits at each moment. The places you run out of hands are the places the layout is wrong.
Counter Height and Where You Stand
Aim for 36 to 39 inches off the ground with the trailer level. That's kitchen-counter height at the bottom of the range and above it at the top, which surprises people who assume a galley has to be a stoop — the height isn't dictated by the teardrop profile so much as by what you decide to put underneath it.
And what goes underneath is the real reason for the range. At 36 inches you're fitting drawers and shallow storage. By 39 you can slide a tall cooler in on a tray and still close the bay, which is the difference between a cooler that lives in the galley and one that rides in the tow vehicle. Size the height to the storage, not the other way round.
The range is also there to be moved within. If one person does most of the cooking, set it to them rather than to an average. If anyone using it needs a seated working height, that's a different number again, and far easier to build in now than to retrofit later. Whatever you land on, keep the toe space clear — a counter you can't get your feet close to, because a bay door or a drawer front sticks out at shin height, will annoy you every single meal.
The test worth doing before anything is cut: stand where you'd cook, at the height the counter will be, with a cutting board in front of you. Cardboard mockups are cheap and they answer this in a way a drawing cannot.
Build It in Cardboard First
The single cheapest thing you can do for a galley is spend an evening building a full-size mockup out of cardboard and packing tape before you cut a single sheet of birch. It looks faintly ridiculous. It will find problems that no drawing does.
Cut the counter outline at its real height and prop it at the real distance from where you'd stand. Block out the fridge bay at actual size. Mark the sink and the cooktop. Then go through the motions of cooking an actual meal — reach for the pan, open the fridge, turn to the counter with something hot in your hand.
What this catches, reliably: doors that open into each other, a fridge slide that needs more room than the bay allows, a sink you can't stand square to, a drawer whose pull sits exactly where your knee goes. All of them are trivial to fix in cardboard. All of them are expensive in finished plywood.
Do it with whoever else camps with you, too. Two people in a galley is a different geometry than one, and the person who does the dishes has opinions about where the sink goes.
The Fridge Is the Anchor
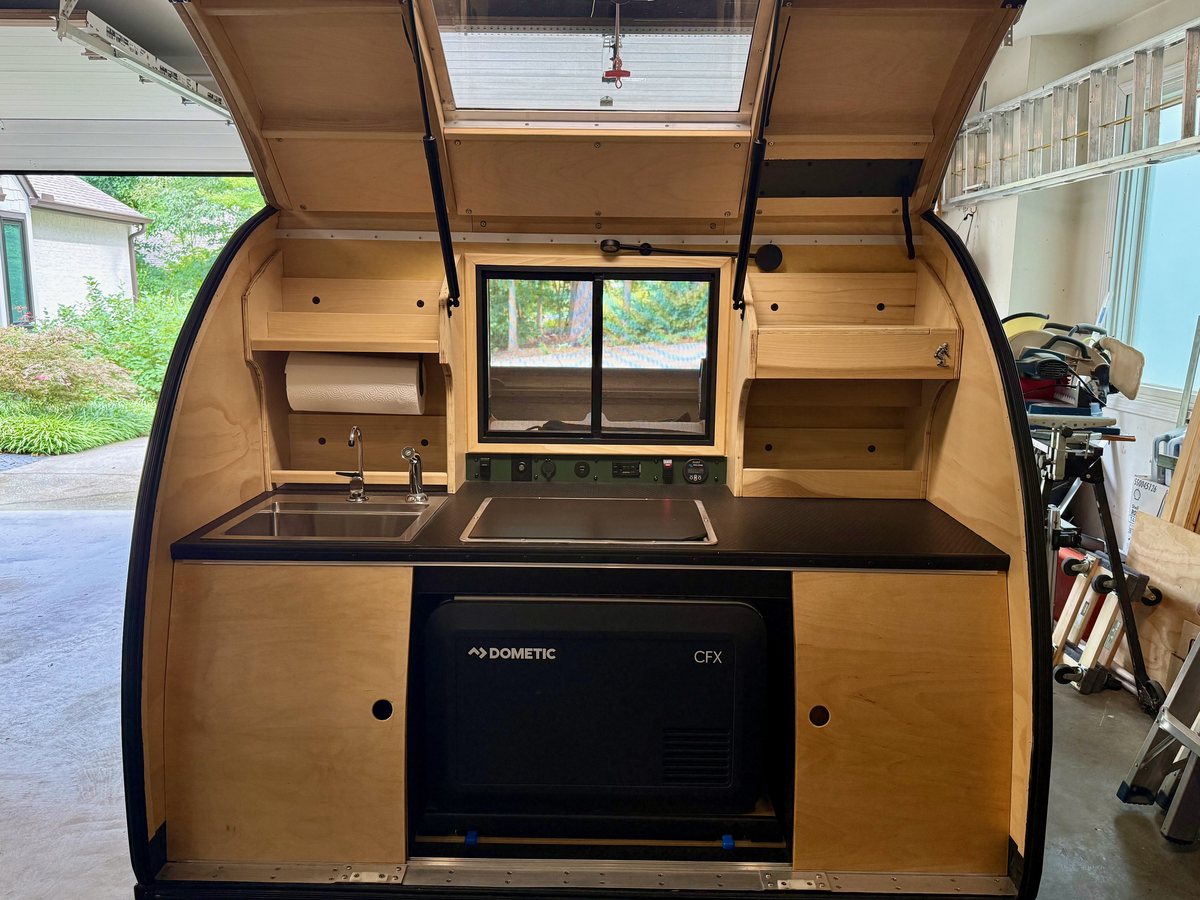
In our build the fridge decided the layout, because it's the largest single object, the heaviest, and the one with the most awkward access requirement. A chest-style compressor fridge opens from the top, which in a cabinet means it has to come out to open at all.
Ours sits on a heavy-duty slide in the lower bay, directly under the cooktop. Rolling the drawer forward clears the counter above and the lid opens fully. The fridge itself never has to leave the bay or come off its power lead. That works — but only because the clearance for it was planned before the bay was cut, not discovered afterwards.
Three things to check before committing: that the slide extends far enough for the lid to clear the counter edge, that nothing above the fridge fouls the lid at full travel, and that the cable has enough slack at full extension without being pinched when it's closed. Any one of those found late means cutting a finished panel.
Water Is a Layout Problem, Not a Plumbing One
The sink is easy. Everything attached to it is where the difficulty lives, and all of it competes for the same volume as your storage.
The Tank
Heavy, and its position moves your tongue weight. Ahead of the axle if you can, and think about how you'll fill it without dismantling the galley.
The Pump
Needs to be reachable, because eventually it will need attention. Buried behind a fixed panel is a decision you'll regret exactly once.
The Drain
Gray water has to go somewhere. A jug under the trailer is simple and legal in most places; a plumbed tank is tidier and more to build.
Winter
Every foot of line is a foot that can freeze. Runs you can drain or blow out are worth designing in, not retrofitting.
The Filler
Where you pour water in decides whether filling is a two-minute job at a spigot or an awkward one with a funnel.
Or Skip It
Plenty of good teardrops carry jugs and have no plumbing at all. It costs you convenience and buys back space, weight and winterizing.
Power Where You Stand
The control panel — switches, USB, the 120V outlet, the battery monitor — belongs where you're standing when you need it, which is at the galley, not tucked inside the cabin where it's tidy. Ours groups all of it in one place at the counter.
Think about what gets plugged in and where the cable then lies. A USB port that means a charging phone sits in the middle of your prep space is in the wrong spot, however neat it looks. Same for a 120V outlet directly above a sink.
Wiring to the galley also has to be run before the panels close up, which is one more reason the layout has to be settled early. Adding a circuit afterwards means either a visible surface run or taking a wall apart.
The Hatch Changes Everything Above You
An open galley hatch is a roof, and its height decides whether you can stand under it. It's also the only thing between your dinner and the weather, which becomes the single most valuable feature of the whole trailer in a Smokies afternoon thunderstorm.
Check the arc it swings through before you mount anything to the underside of it — lights, spice racks, paper towel holders all live there, and all of them can foul something on the way up. Check how far it protrudes when open, too, because that's the space you need behind the trailer at a campsite that may not have it.
Storage That Survives a Forest Road
Drawers Over Shelves
You can see and reach the whole drawer. A deep shelf becomes a place where things live undisturbed for a year.
Soft-Close Hardware
Not a luxury on a trailer. It's what stops a drawer launching itself open on a washboard road.
Fiddles and Lips
A raised edge on open shelving is the difference between arriving with your spices in place and arriving with them on the floor.
Heavy Things Low and Forward
Storage layout is also weight distribution. Cast iron at the back of the galley is working against your tongue weight.
One Deliberate Junk Drawer
Everyone needs somewhere for the lighter, the bottle opener and the headlamp. Plan it or it colonises somewhere better.
Leave Some Air
A galley built exactly to the gear you own today has no room for the thing you buy next season.
In the Galley


What We'd Do Differently
Nothing here is a complaint about the build — the galley works, and we'd repeat most of it exactly. But a few things only become obvious after a couple of seasons of cooking in it.
More Landing Space
The thing you always want more of is somewhere to put a pan down that isn't the burner or the cutting board. It's the first thing we'd buy more of with any spare width.
Lighting Sooner
Cooking happens after dark more often than you plan for. Light under the hatch, aimed at the counter rather than at your eyes, should be designed in rather than added.
A Place for Wet Things
Dish towels, a wet cutting board, a rinsed pot. There's rarely anywhere designed for them, so they end up on the counter you needed.
Reachable Trash
Somewhere for trash that isn't a bag hanging off a drawer pull. Small, and it comes up every meal.
Think About Wind
A two-burner in the open cooks fine until the wind picks up. Whether the hatch and the body give you any shelter is worth considering at layout time.
Fewer, Bigger Drawers
Several deep drawers beat many shallow ones. Small compartments sound organized and turn into places things get lost.
Decide In This Order
Storage last is the part people get backwards. Drawers are the easiest thing to redesign on paper and the easiest to fit around what's already fixed. The fridge is neither.
Starting From a Kit?
Our CNC kits come with the galley cutouts as an option, which means the clearances above are worked out before anything ships — and the panels arrive already cut for them.
See Our Kit BuildsShop This Post
The plywood and the appliances are their own decisions. What's here is the hardware that turns a layout into a galley that works — the parts that ride on our own build, where they're still sold.
Disclosure: KnoxDrops is a participant in the Amazon Services LLC Associates Program. As an Amazon Associate we earn from qualifying purchases — if you buy through a link on this page, it costs you nothing extra.
← Back to Blog