Building the Fridge Slide.
A chest fridge in a cabinet doesn't do you much good until it's out of the cabinet, because the lid opens from the top. So the slide isn't an accessory. It's what makes a compressor fridge workable in a teardrop galley at all, and it has to carry about 37 lb of fridge plus whatever's in it out past the counter, on roads that shake the trailer for hours at a time, without letting go. Here's how I built mine, what it has to clear, and the order I'd do it in so nothing gets cut twice.
What the Slide Has to Do
It has four jobs. It has to carry the weight without sagging at full extension, which is when the leverage is worst. It has to lock closed so the fridge stays put on rough roads. It has to lock open, or the fridge rolls back at you on any site that isn't level, and I haven't found a level campsite yet. And it has to keep doing that for years in a bay that gets road dust, grease, and the occasional rain.
Kitchen drawer slides don't do any of those. A pair of 100 lb ball bearing drawer slides sounds like plenty for a 37 lb fridge until you remember that rating is for a drawer sitting still in a house. Add food, leverage at full travel, and a pothole, and you need several times that.
There's one more job that isn't on the box, and that's fitting. The slide and its base add height and width, and every inch of that comes out of the bay opening, so measure the slide before you cut the bulkhead, not after.
The Slide I Used
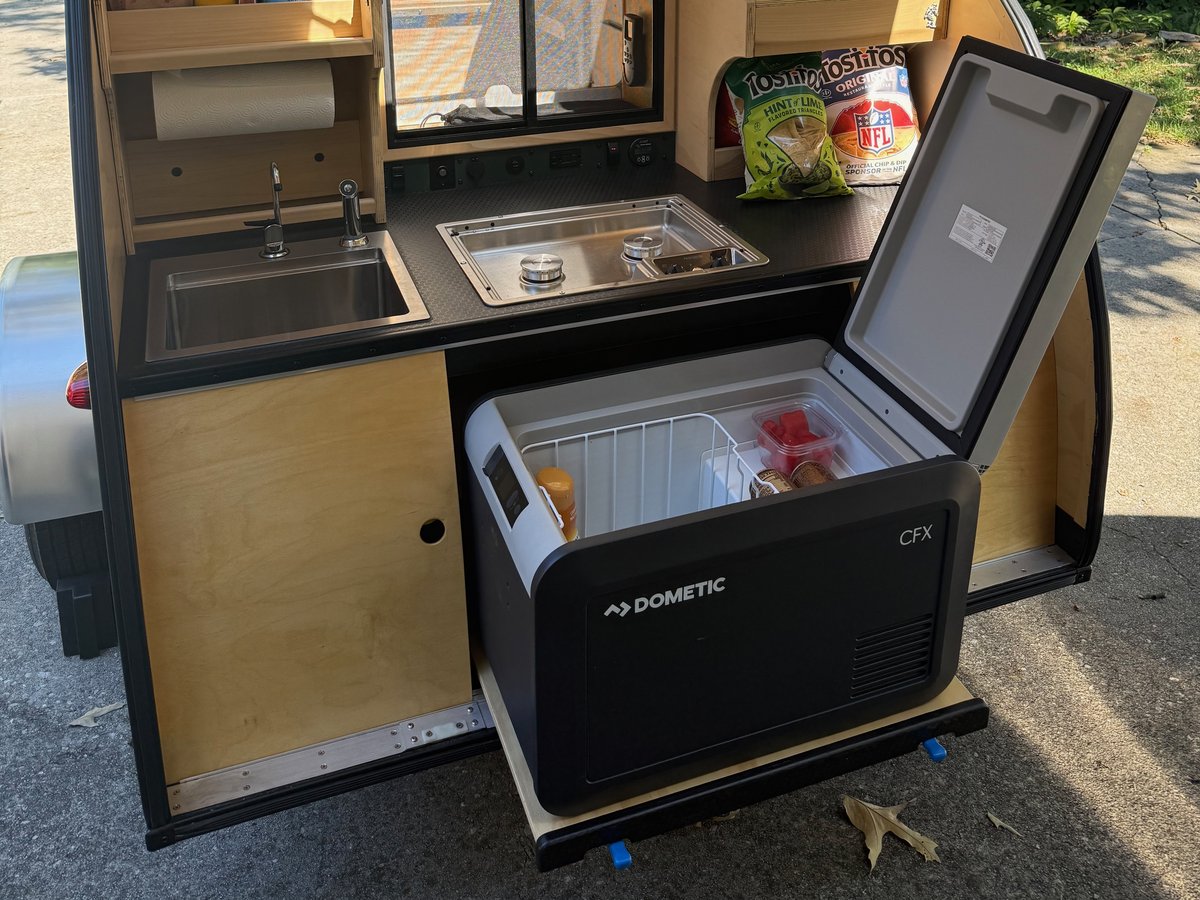
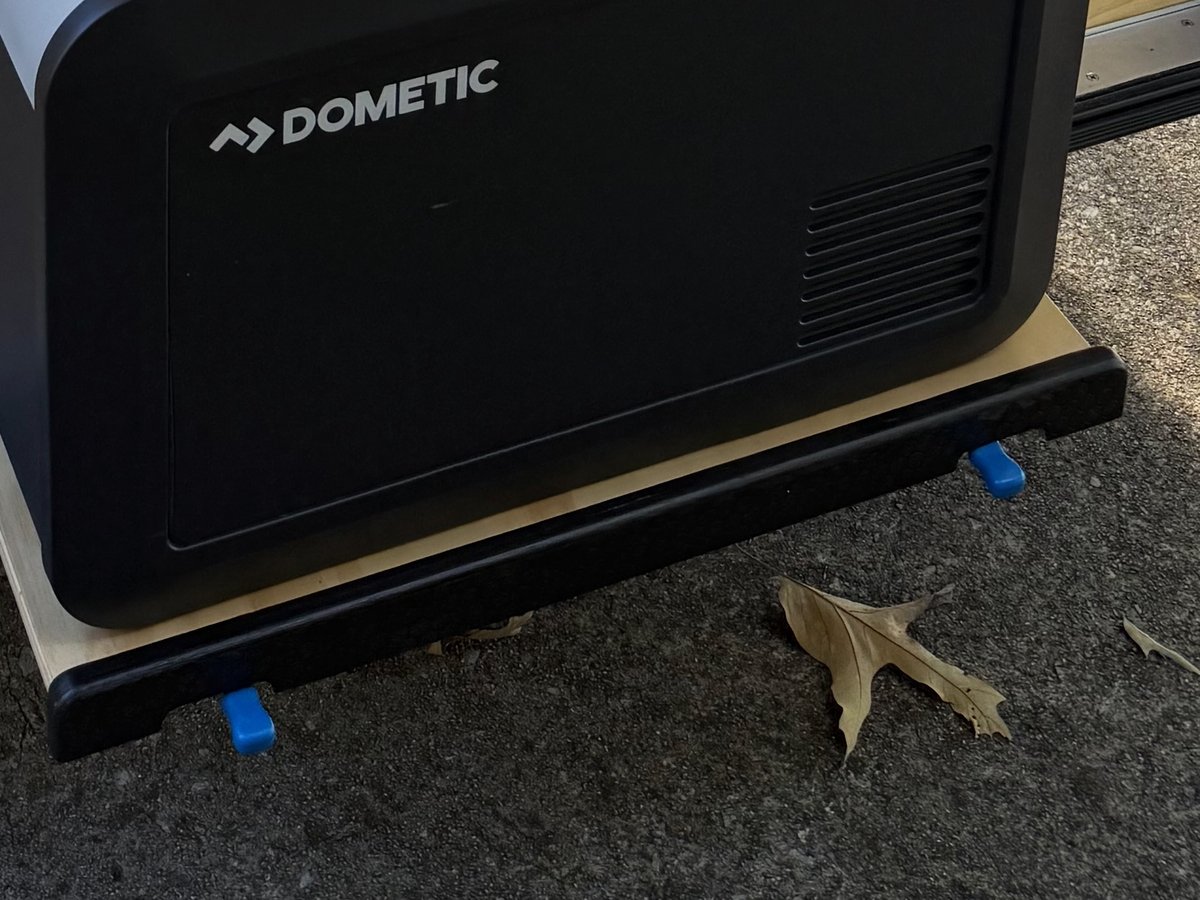
Mine is a pair of SLIDEWAY 16" locking slides, rated to 260 lb, with 53mm wide rails of 2mm steel. They're discontinued, and Shop This Post has the closest match. It's two steel rails on ball bearings with a plywood tray between them and a pair of release tabs at the front that lock it at both ends of travel. The tabs are the blue ones you can see at the bottom of the tray in the photos. Pull both and roll it out until it clicks and the fridge is held open, then pull both again to bring it home.
What sold me on it over a lighter slide was the lock at both ends, a rating with plenty of margin over anything I'd ever load, and full extension. A partial extension slide leaves the back of the fridge under the counter, which is fine for grabbing a drink and no good for finding the cheese at the bottom. Full extension means the whole lid clears.
What I'd say against it is the rails are about 5 lb a pair before the tray, and every pound of that sits behind the axle. The slides aren't expensive, around $50 a pair, but they need a square bay and a true tray, and that's where the time goes. If you'd rather skip all that, a fixed tray where you lift the fridge out to open it is a real option. It just gets old by the second morning.
The Base and the Tray
The slide screws to a plywood base in the bay, and the fridge sits on a plywood tray on top of the slide. Both matter.
The base is 1/2" (12mm) Baltic birch, fastened to the 3/4" (18mm) galley floor. It doesn't go into the trailer frame, and it doesn't need to. First, it gives the slides more to hold on to, since they're screwed through the base and into the floor, so every screw bites into 30mm of plywood. Second, it lifts the slide so the tray clears the rails the sliding bay doors run on. At full extension the fridge hangs out toward you, so the end of the slide at the bay opening pushes down and the end at the back of the bay tries to lift up off the base. Use every mounting hole the slide has. The replacement set in Shop This Post doesn't come with screws.
On the tray, the fridge needs to be held down, not just set there. A fridge sitting loose on a smooth tray will walk. The CFX3 35 has four M6 mounting holes in its base and I used them, so the fridge is bolted to the tray and can't creep toward one rail. If your fridge has mounting points, use them. The tray and base are UltraLight Baltic birch sealed with poly. The floor, bulkhead, countertop, and divider walls around them are UltraHEX, a phenolic faced plywood with marine grade glue, because that's the wet side of the galley. It's water resistant, not waterproof.
Lid Clearance at Full Extension
The open position doesn't exist until everything's built, so work this out on paper first.
With the slide all the way out, the lid hinge has to be out past the front edge of the counter, plus enough that the lid at its full opening angle doesn't hit the underside of the counter. The CFX3 35's lid opens past vertical, so measure your fridge with the lid where you'll actually leave it, not where it stops. Then add the counter overhang and the trim on its edge. On mine the open lid clears the counter by 1/2", on purpose. It only needs enough room to open and close, and every inch the slide travels past that is more leverage on the rails from a loaded fridge.
What's above the fridge matters too. Mine sits right under the cooktop, which works fine because the cooktop is flush, so the counter is what the lid has to clear. If you've hung anything under the counter in that bay, like a light, a hook, or a paper towel bar, the lid will find it. Check the arc, not just the height.
Then there's the hatch. With the galley hatch open, its struts and its lower edge sit somewhere behind the counter, and a fridge at full extension with the lid up puts your head in that same space. Mine clears. On a lower hatch it wouldn't, and no slide is going to fix that. The galley layout post is where that gets decided.
The Power Lead
The fridge is the one 12V load in the trailer that moves, and its cable has to move with it, about 16" of travel, thousands of times, without getting pinched when the slide closes or pulled tight when it opens. Get it wrong and either the plug works loose on rough roads and the fridge is warm in the morning, or the cable gets caught under the tray and chews through its insulation.
Length
Full travel plus a loop. Measure it with the slide out, then add enough that the cable never pulls straight, because a straight cable is under tension.
Routing
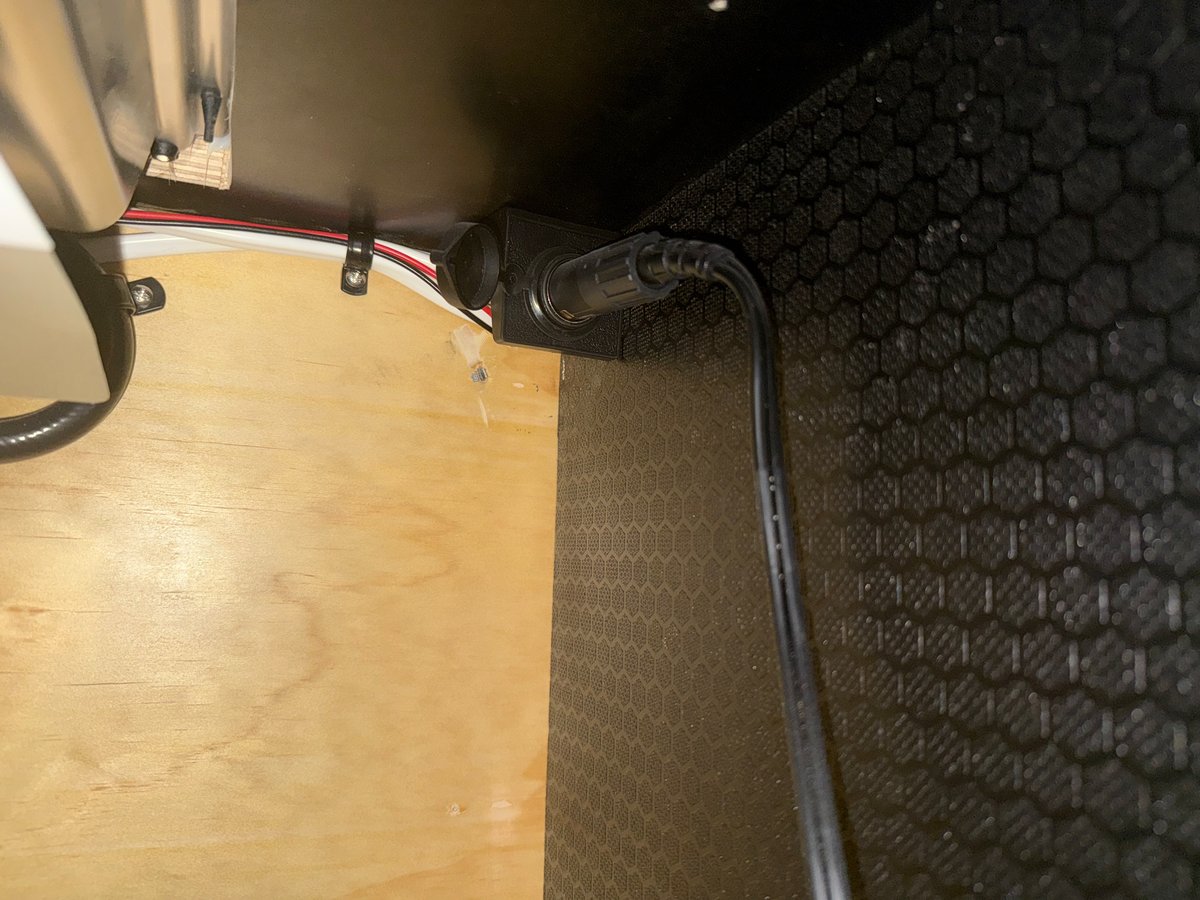
The cable comes into the bay high on the back wall and drops down to the fridge, so the slack hangs in a loop behind the fridge instead of lying on the tray where the slide runs over it.
The Plug End
The CFX3's DC plug locks into its socket, so use the lock. A cigarette style plug on an appliance that moves will walk out on the first rough road.
Strain Relief
An adhesive mount and a zip tie on the back wall, so a yank on the cable pulls on the mount and not the plug. Mine hasn't needed one, but it's cheap insurance.
Wire Size
The fridge doesn't draw much, but it's a long run from the fuse block, so size the wire for voltage drop and not just current. Mine is 14 AWG on its own 15A fuse, sharing nothing.
Test It
Slide it in and out twenty times with the fridge running and watch the cable the whole way. Then do it again with the bay dark and a flashlight.
Holding It Closed on Rough Roads
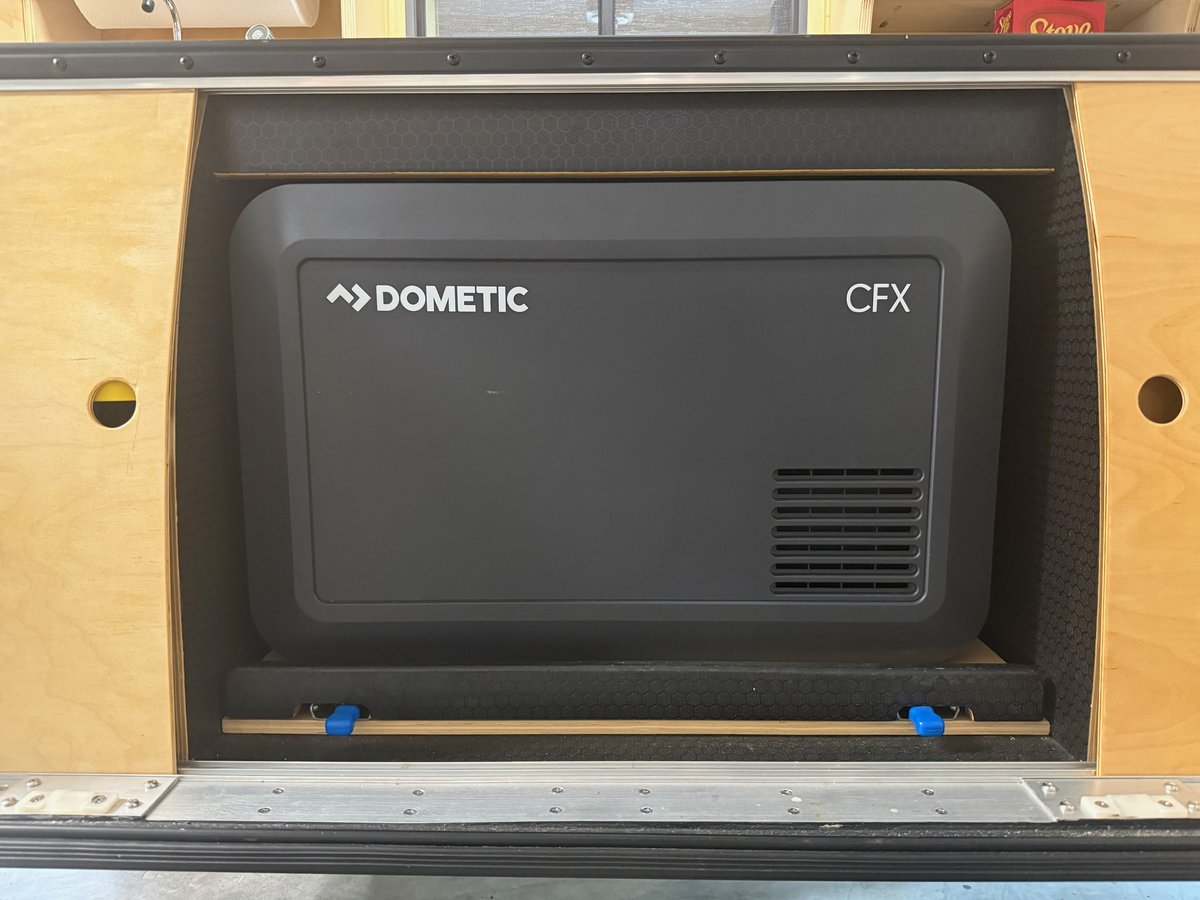
The slide's own lock is what holds it closed. On mine that's the two release tabs, and over thousands of miles they haven't let go. I don't run a second latch or a strap. The galley is tight, and with the hatch closed the tray has very little room to travel before the fridge would be resting against it.
That's what works in my galley, not a rule for everybody. If your bay leaves the fridge room to run, add a second hold, and make it something you can't forget. A strap you have to remember to hook is going to get forgotten eventually, so a latch that's part of closing up the bay is the better way to go.
Test it the way the road will. Load the fridge, close everything up, and drive the worst gravel you can find close to home before you drive the worst gravel in Pisgah. Then open the hatch and see where the fridge ended up. If it moved at all, the lock isn't doing its job.
Air for the Compressor
A compressor fridge moves heat out of the box and dumps it through slotted vents in its own case, and you can see them on mine in the photos. Box those in and the fridge runs longer, draws more, and in a Tennessee July it can't keep up.
I turned the fridge so the slots face the hatch and not the back of the bay. With the hatch open they vent straight out to open air, and with it closed they face the space between the fridge and the hatch instead of blowing into the back of the bay and building heat there. With the hatch closed on a hot day the bay still warms up, and the fridge runs more to keep up. The battery monitor shows it: the fridge usually averages 1.6 to 1.8 amp hours an hour, about 38 to 43 a day, and more when it's parked in the sun with the hatch shut. The battery sizing post is where that number gets used.
If you're still designing your galley, point the vents at the bay opening, since that's the most air you've got, and don't insulate the bay. The heat coming off the compressor needs somewhere to go.
Weight at Full Extension
Two separate things happen when the fridge rolls out, and only one of them matters while you're towing.
The first is the load on the slide and the base. Packed for two people on a two or three day trip, mine weighs 55 to 70 lb, and at full extension it hangs about 16" past its mounts. That's a lever, and the screws at the back of the bay see a lot more than the fridge's weight.
The second is what it does to the trailer. The galley is behind the axle, so the fridge is already pulling weight off the tongue, and rolled out it's even further behind the axle. At a campsite you'll feel the trailer settle back on the jack. It's not a towing problem because you don't tow with it out, but it is a reason the fridge can't be how you fix a light tongue, since it lives behind the axle either way. My loaded tongue weight is 200 lb on 1,900 lb, which is at the low end of the range, and the fridge is a good part of why. The tongue weight post has the math and what actually moves the number.
In the Bay
The Order to Build It In
Most fridge slide headaches come from doing things out of order, so make every cut with the last measurement already in hand.
Mistakes to Avoid
Buying the Slide Second
Measuring the bay for the fridge alone. The slide and its base add height under it, and those inches come out of the opening, so buy them together.
Forgetting the Floor
Whatever else is on the galley floor is in the slide's way. Mine only clears the sliding door rails because the base lifts it, so plan that height before cutting the opening.
Cable on the Floor
A cable routed along the tray will get found by the slide sooner or later. Route it high and let the slack hang.
Room to Run
Slide locks wear. Mine gets by without a second latch because the closed hatch leaves the tray nowhere to go. If yours doesn't, add one.
Vents Against a Wall
The fridge runs harder and the battery bank pays for it. Point the vents at the opening, not the back of the bay.
Forgetting the Hatch
Lid clearance against the counter is the obvious check. Head clearance under the open hatch with the lid up is the one people miss, usually with their forehead.
Starting From a Kit?
The KnoxDrops CNC kits come with the galley bay cut for the fridge slide, sized to whichever fridge you're running, with the bulkhead opening and the base already worked out. The clearances above are done before the panels ship.
See the Kit BuildsShop This Post
The parts that ride on our own build, or the closest thing still sold. Our slides and our CFX3 35 are both discontinued; the cards say so where it matters.
Disclosure: KnoxDrops is a participant in the Amazon Services LLC Associates Program. As an Amazon Associate we earn from qualifying purchases — if you buy through a link on this page, it costs you nothing extra.
← Back to Blog